We suggest students work in pairs. Each student will work on a separate portion of the World Map, but students in pairs can help check each other’s work. Homeschool students can work on their own, completing a few pieces of the map if they’d like. But we provide a key so solo students don’t need to complete all 18 maps.
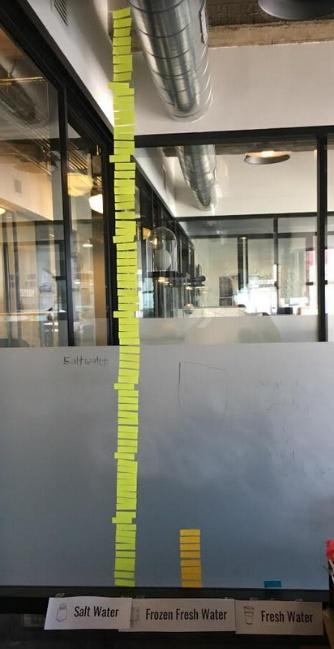
You will need enough space on a wall or door to accommodate a graph that’s 76 stickers high and 3 bars wide. See below for details.
Plan Your Time
If you have limited time, you can divide this lesson into two sessions.
Part 1 (counting and recording squares on a map) takes 10 to 15 minutes.
Part 2 (making the graph) takes another 15-20 minutes. Part 2 begins at Step 6.
Prepare the Bar Graph
Find a good spot for your graph. Cut out the “Bar Graph Labels” and place them on the wall or door. See the photo for the way we did our graph. If you use 1/2” strips for your stickers, as we did, your graph will be 56” high and 30” wide.

Organize the World Maps
Post the “Where In The World Is My Map?” printout so students can see the map sections they’ll be working with during the activity.
Each student will need at least 1 of the 18 different maps we’ve provided. If you have a large class, it’s fine for more than one student to have the same map. If you have a small class, distribute at least one map to each student and use the “Map Checklist & Answer Key” to find the rest of the information you’ll need. We’d also suggest printing out an extra of each map used, if possible, in case a student has trouble counting and needs an extra copy.
Teacher Tip
Be aware that counting lots of little squares can be tricky, and counts may vary, even among students working on the same maps. We suggest you remind students that their work should be as accurate as possible, but a few squares off here or there won’t change the graph. Any answer that’s close to the count on the “Map Checklist & Answer Key” will work out fine.


